Every CBLDF supporter knows that comics are a great medium for expressing what matters. While so many Americans are making their voices heard in demonstrations around the United States, there are also many children and teens feeling a need to express their beliefs or share their experiences who aren’t in a position where it’s safe to leave their home. Thankfully, they can still make their voices heard by exercising their creativity, and mini-comics are a great way to do that!
This resource is designed to help parents and educators support kids who want to speak out through comics by providing specific tips about writing, drawing, and sharing their work.
Why Comics?
Comics are a medium merging words and pictures to create dynamic stories. Whether you’re making a personal narrative, a non-fiction report, or a call to action, making comics is a great way for kids to express themselves with immediacy. Comics are multi-disciplinary by nature, so inspiring kids to make them encourages verbal and visual literacy. You can also partner kids to work together, inspiring greater teamwork.
Why Mini-Comics & Zines?
Mini-comics and zines are short, frequently handmade publications that anyone can make. They’re a concise format that lets a creator make a complete statement quickly and cheaply, but effectively. For kids, making mini-comics and zines provide a sense of accomplishment by allowing them the space to create a complete publication — from creativity to print — all on their own. They’re also highly shareable, and can be handed out to fellow activists, mailed to friends, or even posted online. The format makes it possible for kids to become authors.
If we can imagine a better world, we can make a better world. At a time where we’re all called upon to speak up, making mini-comics is a great way to encourage kids to hone their talents and raise their voices.
Here are some simple tips that kids can follow to make their own mini-comic or zine that shows us the worlds they imagine.
1. Learn How Comics Work
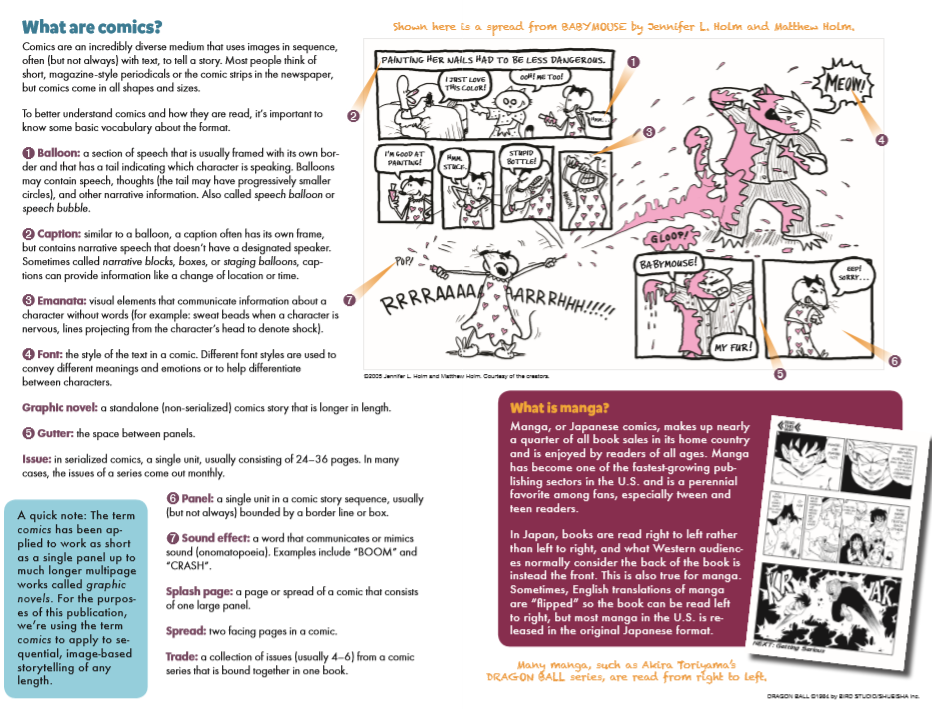
First, let’s get a handle on the parts of a comics page. Key vocabulary includes panels, balloons, gutters, captions, sound effects, and emanata. This spread from CBLDF’s free publication Panel Power shows how the parts of a comics page work. Share it with your kids, and then ask them to point out examples from comics you have around the house. Talk about the movement of the reader’s eye across a page to help them think about ways they can organize their work.
2. Think About What You Have to Say
Mini-comics are a great tool for making a point in a quick, direct way. So, start by asking two important questions:
- what do I want to say, and
- who am I speaking to?
Spend time talking through these questions — not only will they help kids process what they’re going through, they’ll provide them with a way to connect with others through the work they’re about to make.
Educator Jill Gerber uses mini-comics in her classroom and recommends these prewriting questions:
- Purpose Statement: “My Zine will…”
- I want my readers to know:
- My readers should be able to answer the following question/s about my topic:
- Quick Summary:
- Key Ideas That I Want to Include:
- Key Images That I Want to Include:
Additionally, these prompts may be helpful to spark ideas:
- Quotes: Encourage kids to find statements that inspire them towards activism.
- Portraits: Who are people that inspire your kids toward activism? Creating portraits or even short biographies are great for mini-comics.
- Feelings: How are current events making kids feel? Dramatizing them in a mini-comic may be helpful.
- Experiences: Have your kids had a direct experience of justice or injustice? Ask them to express it in their comic.
- Recommendations & Responses: Does your kid have a favorite set of activist books or comics? Maybe they’ve read one of the anti-racist graphic novels we recommended this week and they want to make a response to the author? Response comics are a great way to continue the conversation.
- The Future: What is the world they want to grow up to live in? Ask them to express it in their comic — it may just inspire others!
3. Decide On Your Format
Before you start working on your story, think about what you want your final mini-comic to look like. Determine what size paper you’re working with and how you’re going to fold it into booklets. Creator and educator Jessica Abel points out the most common mini-comics formats:
5.5” x 8.5” This is the most common and cheapest format for a minicomic, and it’s called “DIGEST SIZE” (Cheapest because the paper is cheap and photocopies on it are usually the cheapest available at any copy place). If you fold it again the long way, you get a booklet that’s…
5.5” X 4.25” This is possibly the second most common size, and it’s called “MINICOMIC SIZE.” Take note that for this book to open and read, you will have to trim one edge after you staple it. And the final fold, the long way, will create a tiny book that’s…
2.25” X 4.5” This is called “MICRO SIZE.” In this format, you have to cut two edges off after it’s stapled.
There’s a lot more good information about this in the incredible overview on Jessica’s website: https://jessicaabel.com/resources/diy/making-minicomics/
If you want to get right to the nitty-gritty, here are a few format templates you can download:
- Here are several booklet templates for Word; these are great if you’re putting together a zine using two or more sheets of paper: https://anatomicair.com/book-templates/
- Here’s a great one sheet, 8-page zine format tutorial from the LA Zine Fest: https://www.lazinefest.com/resources
- Marek Bennett created this terrific video about how to make an 8-page mini-comic:
- Here’s another short video about how to make a zine from one piece of paper.
Work with your kids to decide on what template they want to use, then the fun starts!
4. Let’s Make Comics!
This is an exercise in self-expression, not perfection. Ask your kids to take what they have to say and start breaking it down into the amount of space they’ve decided to fill. We recommend working in four or eight page units and asking kids to do one to two panels per page. They’ll feel a real sense of accomplishment when they start to see their work take the shape of a book!
Storyboards & Pre-Writing
Once you know the size of your mini-comic, it’s time to start laying out your story. Here’s a couple of quick and easy storyboard and writing tips to help kids get to work.
Index cards: Have students prepare rough drafts of their panels with stick figures and spare narration and dialogue, using one panel per card. This lets them arrange panels to determine how their story will flow before committing to a final drawing.
Templates: Jill Gerber says: “Other students prefer to plan a story by using templates. Below is an example of a fill-in-the-blank template that I have used with great success.”
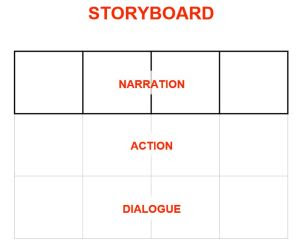
The above template helps kids determine what happens on each page, with space for narration, action, and dialogue.
You can also use Let’s Create, an activity book from CBLDF with readymade comic book page layouts that you can use for both pre-writing and final drawn pages: https://cbldf.org/2020/04/lets-create-comic-books-new-free-templates-for-inspiring-activities/
Remember, there’s no right way to make a comic! Even life-long professionals differ in how they make their work, even from project to project. Let your kids experiment with what works best for them!
Writing & Drawing
Now comes the fun part! Once kids have their story planned out, it’s time to move onto making the comic. If your kid is drawing the comic themselves, they can use their storyboard or index cards and start drawing their final pages. To keep it simple, we recommend that they work at the same size as the finished comic and draw on individual sheets of paper cut to the size of the final project. At the end you’ll paste those drawings onto the master copy.
If your kids are working in pairs or larger groups, we recommend a few simple approaches:
Scripting: If one of your kids is writing for another person to draw, they should write a simple script. There’re many, many, many different ways to write a comic script, so don’t get hung up on format. They just want to focus on conveying information clearly for the artist to draw.
This script template from our friends at Comics Experience is a good guide. https://www.comicsexperience.com/wp-content/uploads/2017/01/Comic-Experience-Script-Template-2013-10-05.doc
Penciling: Whether a single student is making all the art, or whether they’re sharing chores, we recommend that you split the art into two stages — penciling and finishes. Penciling will lay out all of the story information on each page, including characters and lettering. Pro-tip: put in the lettering first, and then build your pictures around it!
Finishes: This is where your artist can really shine! Either apply ink, colored pencils, markers, or paints above the pencils to make the artwork shine. For zines, simple is best, so encourage kids to work in black and white or limited color. This lets them get a sense of completeness and limits the chance of overdoing it.
5. Sharing Your Comics
This is where it all pays off!
If you’re making one of a kind booklets, take each finished page and glue it into the template, and voila — you have a hand-made art zine!
If you’re making something to share, you can paste the finished art into a template and then photocopy them. Make sure your pagination is correct before you start printing! At the end, take the copies, fold them and staple them and now you have a printed mini-comic!
If you have access to a scanner or camera, you can also scan or photograph each individual page and insert them into an album on social media or as individual images in a post, creating a webcomic reading experience. When you post, don’t forget to use hashtags to help people find your message.
Whatever age you are, it always feels amazing to complete a creative work that you can share with the world. It will feel even more amazing when kids use their creativity to express their solidarity with an important cause.
The Bottom Line
Kids have rights, kids have voices, and kids voices matter. Encouraging them to make mini-comics is a great way to inspire activism, reflection, and engagement.
Creativity is habit forming and confidence building. Following these simple steps, and letting kids experiment and play will help them unlock their own creativity for making comics. Start simple — they can get more elaborate from here as they make more mini-comics in the future.
Young people have a lot to show us. Comics is a great way for them to express what they have to say about making a better world. We can’t wait to see their vision!
Don’t forget to show us what they make when you post on social media by using the hashtag #cbldf
CBLDF is a non-profit organization that needs your help during these difficult times! Help support CBLDF’s important work by sharing this article. You can also donate to support our efforts by visiting the Rewards Zone, making a donation, or becoming a member of CBLDF!